


I apologize in advance for the cruddy photos in some places. I'm a fursuiter, not a photographer.
The very first step I take when making a head is to make a "cap" out of mesh. I measure the circumference of my head and cut a strip of mesh just longer than that length. (Sometimes, when working with smaller sheets, this means splicing two pieces together.) Using yarn and a heavy needle, I sew the strip into a circle, overlapping the ends just a bit. I then add two more strips, crossing my head from back to front and from side to side. When on my head, the headband should rest above my eyes, but not too far above.
Next I'll add two cheek pieces. These are what I'll run the longer strips for the muzzle and the jaw from, so they need to come down to the base of my jaw. If you're doing a static jaw the length here isn't really critical, so long as it's long enough that your head will fit in it, but for a moving jaw it must be exactly right, or your chin won't properly fit the jaw-strap. Which is why, in addition to head circumference, I now have customers measure their jaws too. I used to use a huge, wide cheek piece, as you can see on the Drabbit, but I've found that a smaller piece works just as well.

Now it's time to start building the shape of the face, and this is where the thing should start to look like the creature it will become. But only kind of. This is only a skeleton. Remember, you're going to be adding a layer of foam and a layer of fur over this, like muscle and fur on a real animal. If your mesh looks exactly like the creature you're making, the finished product will look miss-proportioned. Take a look at the wolf head and then at the Drabbit head. The wolf head doesn't look very wolflike, does it? And the Drabbit hasn't got his eyebrows, or his rounded muzzle. Those shapes were added in fur and foam.
I begin with the muzzle, building out from the cheeks, and down from the headband. Try on the head every so often to make sure that the muzzle isn't going to interfere with your vision. A bit of blocking can't be helped, but the Drabbit, being my first head, has a few mistakes, and one of them is that you have almost no field of vision, because of how high up the muzzle comes. If you really need that for your character, go for it. Just be aware of the trade off you�re making in terms of looks vs. practicality.

Now, on the jaw. I've never made a static jaw at this point. I don't like them much, so I may never do one. Moving jaws are hard to make work right, admittedly, and most of my early efforts were only partially successful, but even if the jaw won't "talk" correctly, with a moving jaw you can chose to wire it shut or leave it open for more air.
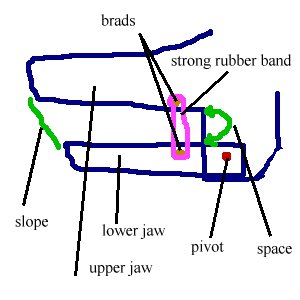
I start by making the lower jaw piece from mesh, putting a few cross-braces on the bottom, to add structure to the shape. I fit the jaw to the head as I go, checking the lengths and sizes of things. It�s very important to have a space between the upper and lower jaws. A lot of people bring them both in to the same point, and I did that on a few of my early heads, but remember, you're going to be adding teeth and gums, or at least some fur around the edges. That will make the upper jaw come down lower, and the lower jaw come further up, and if you started with them meeting nicely, the additional stuff will keep the jaw from closing all the way. Also, look at real animals and pictures as you go. This is helpful all the way along, but especially here. A common problem that bugs the heck out of me is when people line up the front edges of upper and lower jaws exactly straight. They shouldn't be straight on most animals, they should slope! (see diagram) Clench your teeth. Unless you really need dental work, your lower teeth are further back than your upper, and your lower lip is just a bit further back to. Animals are even more this way, just look at any wolf, horse, or cat in profile.
Right, so now you have a jaw piece. Time to attach it. Just sit in in place and mark a spot to put a pivot point. I used to use brads for the pivot, but they tend to pull out when stressed. I now use a very small bolt and nut combo, and it works great. Then add two brads on each side, one in the upper jaw, one in the lower, and stretch a pair of strong rubber bands between them. I usually use the cloth covered kinds meant for holding a ponytail in. The brads should be placed so that they're very slightly under tension when the jaw is fully closed. If they're too loose, or not strong enough, they won't hold the jaw shut properly. Now you just try on the head so you can measure where to put it, and add one more piece of mesh, a jaw strap placed so it will rest comfortably below your jaw. (You may want to add a small pad of foam covered in cloth to this as well, just for extra comfort.)
You now have a complete mesh understructure, yay! Next, the assorted bits and pieces. Your head is going to need a nose, eyes, ears, gums, teeth, tongue, and possibly stuff like horns and spikes as well. Of course you may decide to leave off any of those, (except probably the eyes. And eyeless head would be very strange, to say the least,) but I'm going to show you how I make all of them.
Let's start with the easy stuff. Noses and spikes. I stick those together because I make them both the same way, out of a children's modeling compound called model magic. It's very light, air dries, is easy to work with, and relatively strong. It's also a touch brittle in thin pieces, and isn't waterproof, so be aware of where you've used it. It takes about a day to dry, depending on the thickness, and takes paint very well. I sculpt the shape I need and then I usually coat it in tool dip or acrylic paint after it has dried. The drabbit's spikes are all model magic and tool dip, and so are all the noses I've ever done, from large to small.

Now while your nose is drying, let's move on to ears. Ears are almost always made from fun foam, or foamies. I have a heat gun that I use to shape fun foam with, but you can shape it over the stove if you're careful, or cold shape it by repeatedly curling and stretching it in your hands. But heat works best, and if you're going to be doing a lot of ears, or doing something else, like the drabbit's scale plates, which are also fun foam, I recommend getting a heat gun. Wal-Mart has them for around $20. They'll be in hardware, as they're meant for paint stripping. I then fur the ears separately, using hot glue to attach the fur, sometimes furring both inside and out, sometimes leaving the inside the original foam color, and occasionally adding paint for veining. (A note: if you're going to paint foam, seal it first. Ordinary Elmer's glue, about two coats, makes a good sealant.) Oh, and pleeeeeeeeeeeeeeeeeeeeeeease fur the ears with the fur running from the base towards the tip, would you? Real animals' ear hair runs that way, and the other way drives me nuts! You can also add earrings easily. Get curtain rod rings, also from Wal-Mart, and paint 'em whatever color you like.

Now, to the gums and teeth. I make the teeth first, from sculpey. I usually use the translucent color, as it makes a very convincing tooth look. I generally avoid the white. Use ivory if you don't like translucent, but pure white just looks wrong. Nobody actually has white teeth, least of all an animal! Make each tooth with a small, pointed, conical "root" so that you can glue it into the jaw. The jaw and tongue I sculpt from model magic again, just sculpting it straight over the mesh of the jaw. Now, this is very important, while the model magic is still wet, press the teeth into place. Make one jaw at a time. Do the upper, set the teeth, let it dry completely with the teeth set in it, then remove the teeth, paint it, (glossy is good for that "wet" look,) and glue the teeth in place with a strong glue such as E600 or Goop. Now you can do the lower jaw, using the same process, but stopping frequently to fit the lower and upper together to make sure that the teeth interlock correctly. Very important that, or yet again the jaw won't close right.


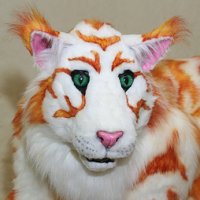
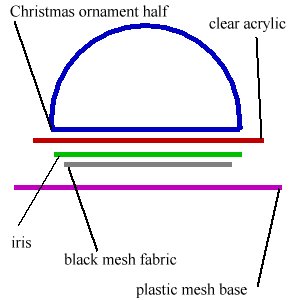
Next, eyes! The eyes are sometimes the best part of the head, and I'm very fond of the "gem tone" look that my eyes have. Here's how to do them. Begin by making the iris. Bright, strong colors are good here. It needs to stand out! I used to just make them from paper, but now, in the interests of durability, I make them from fun foam. I begin by getting the correct size, (the size of the globe that will go over them, more on that in a bit.) and cutting out two circles of that size. Then I cut two smaller circles out of the centers, for the pupils, where I'll look out. Then I coat the iris in two coats of Elmer's glue, to seal the foam. Then I paint the iris on it, being sure to paint the inside edge black, so the original foam color won't show there. I then cover the pupil hole from the back with two layers of black chiffon fabric, and now I have an iris ready to go!
If you're doing very small eyes and can't get a big enough pupil, of if you're worried about having a limited field of vision, you may want to use my alternative method, which involves buckram fabric. Ask your local fabric store if they carry it. And get the stiff kind, not the flimsy kind, if you can. It's white, and takes paint well. Cut a circle of it and paint the whole thing with iris and pupil. You'll be able to see out from the whole area of the eye. The colors aren't quite as intense as the solid foam eyes, so this is a trade-off.
So anyhow, one way or another you now have an iris. You now need a plastic Christmas ornament globe, the kind that comes apart into two halves, which you can get at most craft stores. You'll also need two circles of clear acrylic. This is to seal the eye, so that you don't fog the inside of the globe. I didn't used to use this, but the eyes in my heads fogged up a lot, and then they looked creepy and white-eyed. Not good. So I now seal them. The back of the sealing piece itself may fog up a bit, but at least you're the only one who will know. With all these pieces in hand, get two squares of the plastic canvas you made your head frame from, and cut out holes in the center so that the plastic canvas won't be visible through the chiffon/buckram. (The holes should be slightly larger than the pupil, if you're using a foam iris, or slightly larger than the colored eye area itself if you're using buckram.) Then glue the iris over the top of that, being careful, with the buckram iris, that none of the glue is behind the painted parts, just glue around the edges. Now, glue on the acrylic circle. Then add half of the Christmas globe on top of each. I usually add eyelids from fun foam at this point, though sometimes I'll wait until I have the head foamed.
Horns can be made from fun foam as well, heat molded, hot glued together along the back where it won't show as much, and then coated in tool dip. Paper mache can also make good horns, but how to do that correctly is a whole 'nother essay, and a subject I still haven't quite mastered.
All these parts should now be attached to the head, except for the ears. Hot glue is good for the nose and any spikes. Larger horns should be attached with something else as well, like a few brads at the base, or a wire run down the inside and sewn to the mesh. The mesh backing of the eyes should be sewn onto the headband. We'll get to the ears later.
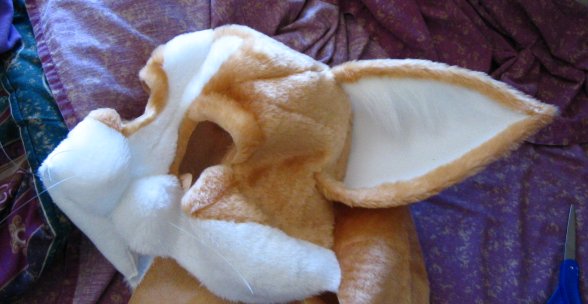
Now, on to the foam! I use foam sparingly. The more foam, the less air circulation you'll get in the head because, while fur fabric breathes very well, foam breathes not at all. Using hot glue I add foam to the end of the muzzle, to round and shape it, sometimes a touch to the lower jaw, always at least some to the cheeks, and a bit over the eyebrow area and up across the top of the forehead. (I left that off on the otter head, and it looks a bit odd when it gets poked accidentally in the head, because the forehead fur dents in.) You don't need any on the back though, your own head there will hold the fur up. I use ordinary upholstery foam, (I like the 1 inch thick sheets, as I've found that it's easier to glue more of them up to get thickness than it is to cut down larger chunks to get skinny bits,)and cut it with my cruddy pair of scissors. Foam will dull scissors, so don't let it near your nice fabric scissors. I've heard of using electric knives and other such, but as I keep the foam to a minimum, I feel that's a bit overkill. The exact shape of the foam will depend on the critter you're making, and in some cases, like the Chiepoo cat head, I've even built up the foam around the eyes, to make them deeper set and less bug-eyed. If you do that, don't forget to add on the eyelids over the foam, not under it.


It feels like you're almost done, just the fur, right? Well, furring can be the hardest part of making a head, and it used to give me massive annoyint fits trying to get things furred correctly. Then I found a shortcut that makes it all much, much easier!
What you need to do is take the head frame, and cover it in saran wrap. You'll want enough layers that it won't just fall off, but don't get carried away, you don't want the saran wrap to add thickness to your head.
Then very carefully cover your head in duct tape, putting the tape only where you're going to have fur. Leave the nose, eyes, gums, etc. uncovered. This will take you a while. Use small pieces where you need to, and be sure you completely cover every bit of the head that's going to want fur. Though don't worry about the neck, you can add that later.

Oh, and I fur the jaw as a separate piece. It's only sewn onto the rest down where it hits the neck. It's not sewn on at all where it meets the cheeks. Instead I run the fur back far enough that it disappears underneath the fur of the cheek area. This works even on short pile furs, but looks best on longer piles where the fluff hides the joint. So you won't want to tape over the join between upper and lower jaws, as you won't fur over it either. In fact, I find it's easiest to remove the lower jaw while making a tape pattern, and tape up and fur it separately.
Anyhow, back to your tape. Once you have duct tape everywhere your fur needs to be, get out a sharpie! Draw on any areas where the fur will be a different color. Now, cut your duct tape pattern off of the head. Cut out all the different colored areas, like spots, eyebrows, muzzle, whatever. Then lay each piece flat on the ground. You'll notice quickly that some areas just don't want to lie flat. cut slits, or cut apart the pieces further as needed until the duct tape is completely flat, or very close to it.
Now, flip over your pieces upside down, and trace them onto your fur fabric. Pay attention to the direction the fur ruins. (Here's another good spot to look at real animal photos to see how fur should go.)
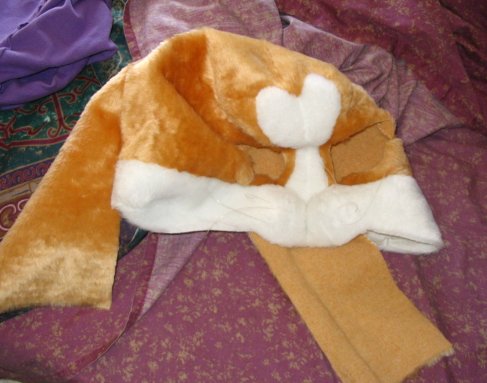
Once you have all your pieces, you can just glue them down to the head. However, I find it looks better, and holds up to wear and tear better if you sew them together first. I sew up all my pieces into a kind of "skin" of the head. Weird looking, isn't it?
Once the head skin is all there, I finally add the ears. I put the skin on the head and hold the ears up to where they go, marking along the edges with pins. Then I turn the skin inside out, mark a line along the pins, cut a slit there, and sew the ears into that slit, so that they're sewn onto the head. With very large ears that lie back, like the Drabbit's, I don't do this, as they need more support than just being sewn in. But even very large ears can be sewn in, if they stand up, as the base of the ear will provide its own support as it presses down on the mesh. The Drabbit I furred the ends of the ears, but not the very base, then attached them to the head with brads, and then furred over them just like I furred the rest of the head. But the Drabbit was glued, not sewn. And if you look veeeeeeery closely, it shows. You can see the joins between the different pieces of fur I glued down. It's even more obvious on my early short pile heads, like the ferret, which is why I switched to the sewing method. Sure, shortpile sill shows the seams a bit, but not nearly as much as a bad glue job.
Once you've gotten the ears on you can pull the skin over the head and glue it down. I glue around the nose, around the eyes, around the jaw base, around the gums, and at the back of the head. Lastly I sew on the neck fur, Which is pretty much bunch of square pieces that hang down from the head, so that's not too hard to make, and we're 100% done! Unless you're going to add a fan, that is.

Okay, one last thing. Fans! I've put a fan into two heads now, and it's not that hard. Small computer fans, meant to run on 12 volts, but perfectly functional on a normal 9 volt battery, are cheap and fairly easy to find. You want something simple, small, and lightweight. You'll also want a switch, though if you'd rather not bother, you can turn the fan on and off by unhooking it from the battery. I prefer the switches though. I usually use the screw holes to sew the fan into the head where I want it (usually in the muzzle, so I get air right in my face,) and then sew down the wires to the mesh of the cheek piece, and then around to the back, where I sew a little pouch for the battery against the back of the neck. I'm no electrician, but it's easy enough to solder the switch in between the fan and the battery. Ask at the place you buy the wiring and switch if you need more directions on how it goes. The switches I use are kinda oddly wired, but I just used trial and error to figure out which wire went where. Usually if you wire it backwards, the fan just blows the other way, so it's no big deal.
Now you're done! If you have any questions aobut the details of this process, (I couldn't possibly cover everything in this one page!) feel free to mail me and ask.
Supply list:
Fur suppliers are listed under their own section on the main how-to page.
Mesh, or plastic canvas, can be had at any Wal-Mart or craft store.
Brads can be found at any office supply, craft store, or Wal-Mart.
Hair bands can be found at any Wal-Mart.
Small nuts and bolts will be at your local hardware store.
Tool dip is also found at hardware stores, or can be purchased from plasitdip international.
Model Magic will also be at your local craft store, and some Wal-Marts cary it.
Fun foam or foamies can be fond at the craft store or at Wal-Mart.
Hot glue is likewise found at craft stores and Wal-Marts alike, as is
A glue gun.
Sculpey can be found at any craft store. Don't get the Sculpey I, get either II or III, or super sculpey.
Christmas globes are also at craft stores, but if you want sturdier ones, or can't find any, try FX Supply.
Acrylic disks can be found in assorted places, but I get mine from Tap Plastics.
Black chiffon or Buckram (you need one or the other, not both,) can be found at any local fabric store.
Foam can be purchased at a fabric store, upholstery store, or Wal-Mart.